Outline
Step.1 Register & Log in |
Step.2 Add project |
Step.3 Upload image |
Step.4 Management |
Step.5 Detect |
Step.6 Confirm |
Step.7 Export |
HEAP Tutorial
Identify the parasite eggs in the images
Millions of people in the world are suffered from parasite infections[World Health Organization 2020]. Parasite detection requires long-time trained professionals to spend a lot of time observing and identifying. This platform provides an easy-to-use operation interface to assist in rapid detection. Here is a brief description of the operation of the platform.

First, you will enter the login page. If you have an account, you can log in directly (a); otherwise, please go to the registration page to register before using the platform (b). When registering, please fill in your personal information and account password (c). After successful registration, you can log in with this account and password.
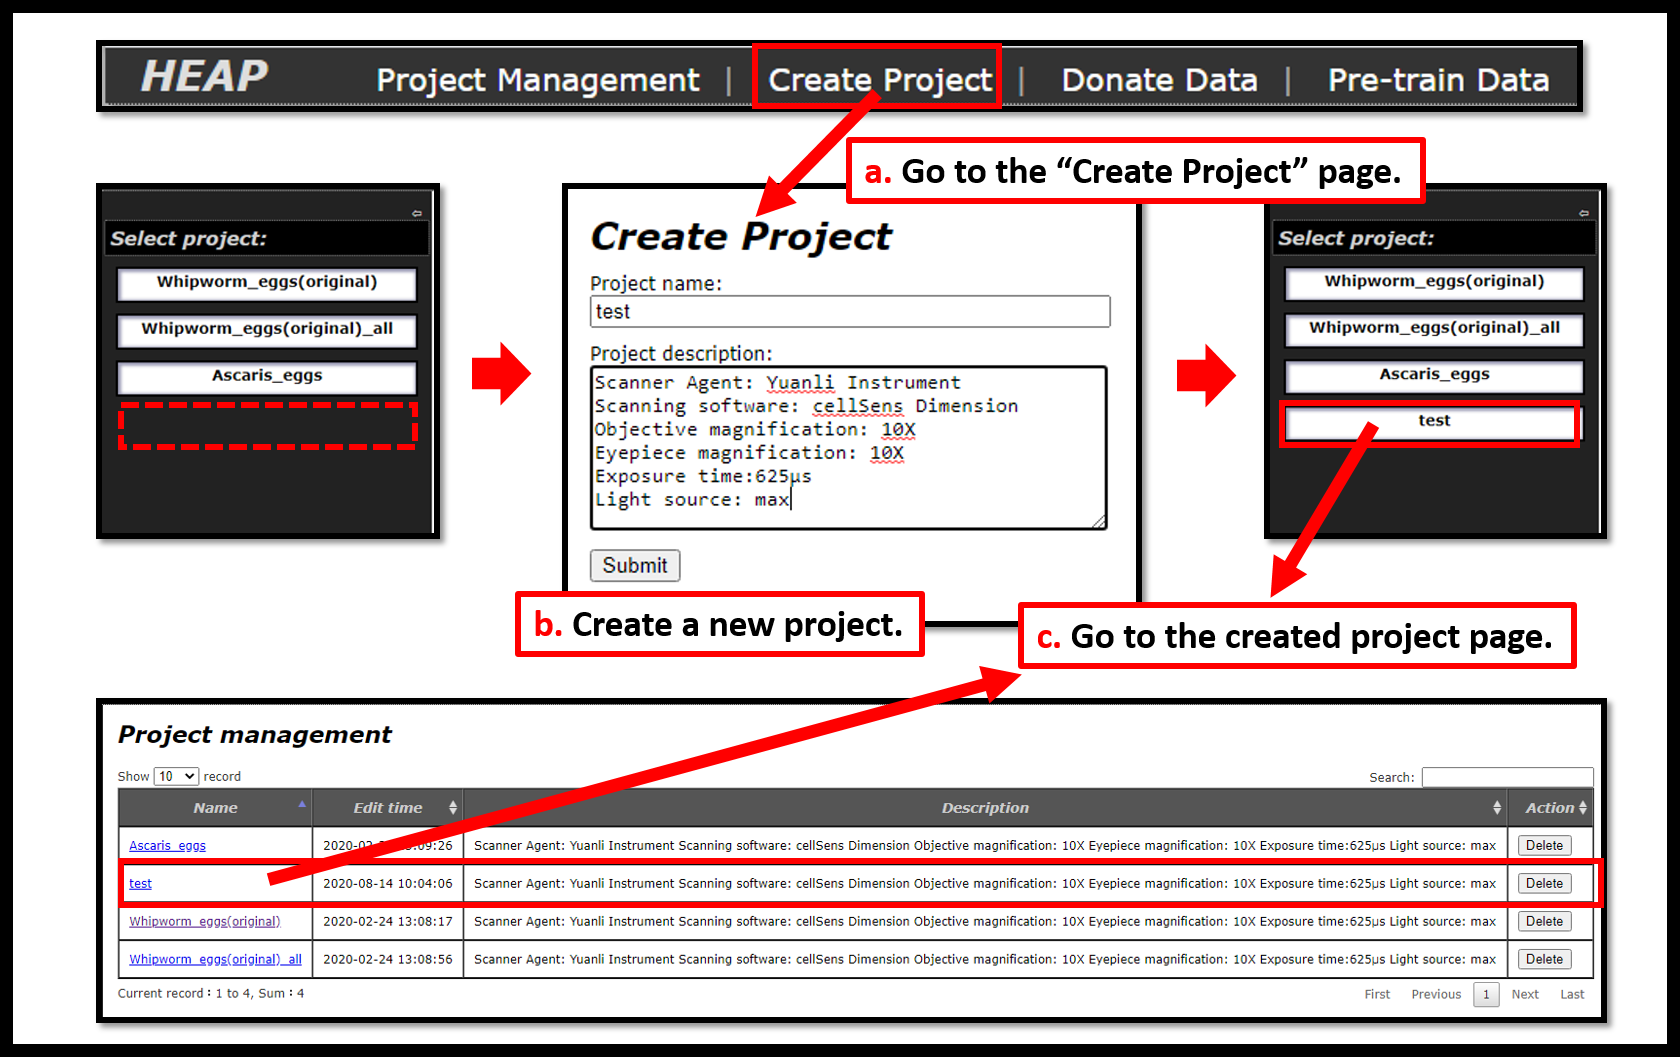
After login, you will enter this page by default or click "Create Project" on the main menu (a). Fill in the basic information of the project to create a project for the target slide (b). You can enter the created project page through the "Select project" menu or the "Project Management" of the main menu (c).

After creating the project, you can see the functions of uploading, testing, confirming, and downloading the project in the function menu. The first step is to upload the image of the target slide. After selecting the item, enter this page by default, or click "Upload img" in the function menu (a). Fill in the image information and upload the image (b). There are four upload methods, including local, Google Drive, OneDrive and Dropbox (b-1)(b-2).
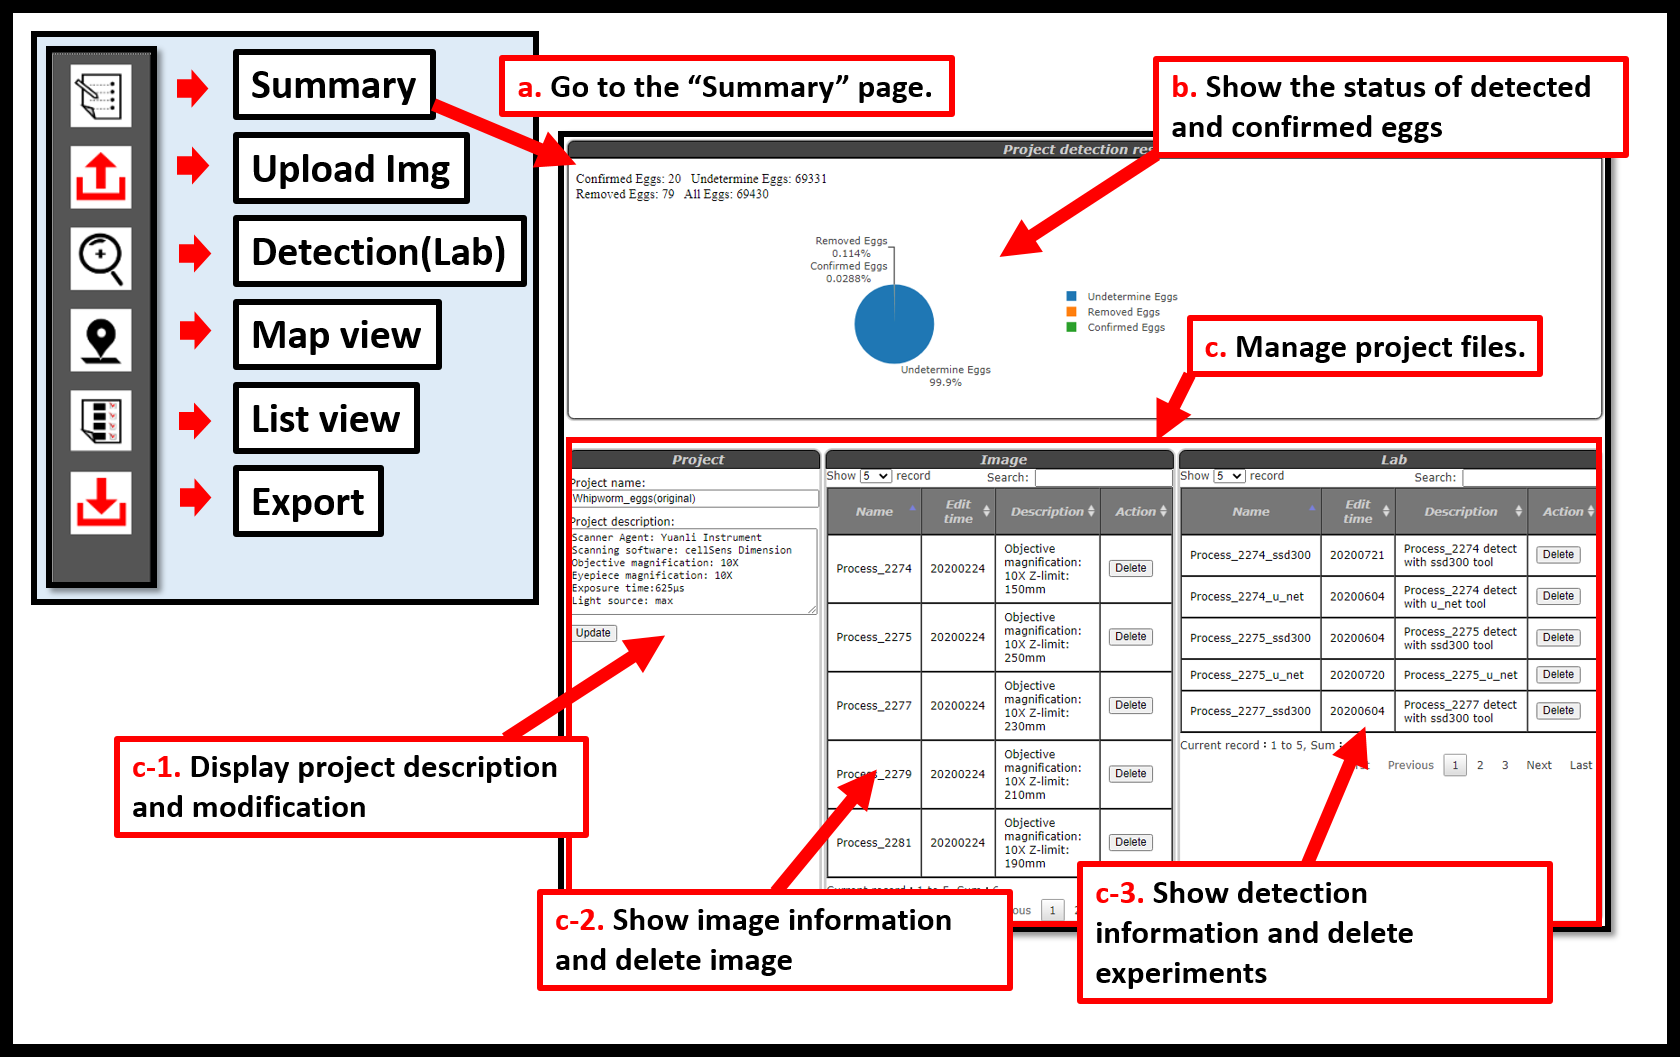
Click "Summary" in the function menu, the files used in the frame selection process and the confirmation status will be displayed (a). Use the pie chart to display the confirmation status of the eggs detected by the project, which is convenient for users to quantify the eggs of parasites (b). The description data of the project, the image information used, and the preliminary identification information can be modified in this interface to facilitate user management of the project (c).

After uploading the image, you can set the identification parameters to initially identify the eggs from the image. Click "Detection(Lab)" in the function menu to enter this page (a). Fill in the identification information and select the tool to identify the parasite egg type in the target image (b).The target image is derived from an image uploaded in the past (b-1). The menu will display the type of parasite eggs currently available for identification and the tools that support this type (b-2).
After the initial identification is performed inside the platform, the "Map view" and "List view" pages provided by the platform can be found from the function menu to allow users to verify the selected parasite eggs.

The "Map View" page displays the initial recognition result of the platform on the image (a). The page contains a display interface and a menu to operate the interface (b). You can first understand the operation of the page through the description (b-1). The thumbnail shows the location of the original image and the location of the parasite egg box. The user can change the display position of the original image by using the arrow keys and clicking the box on the thumbnail (b-2). The menu provides selection of the background image and the results of different identification methods (b-4). The mouse wheel can control the images of different depth of fields displayed in the background, which can be visually inspected by technicians. The user can drag the confidence threshold bar to filter out the predicted candidate eggs (b-3), and then click the mouse to confirm and delete the predicted candidate eggs (c).
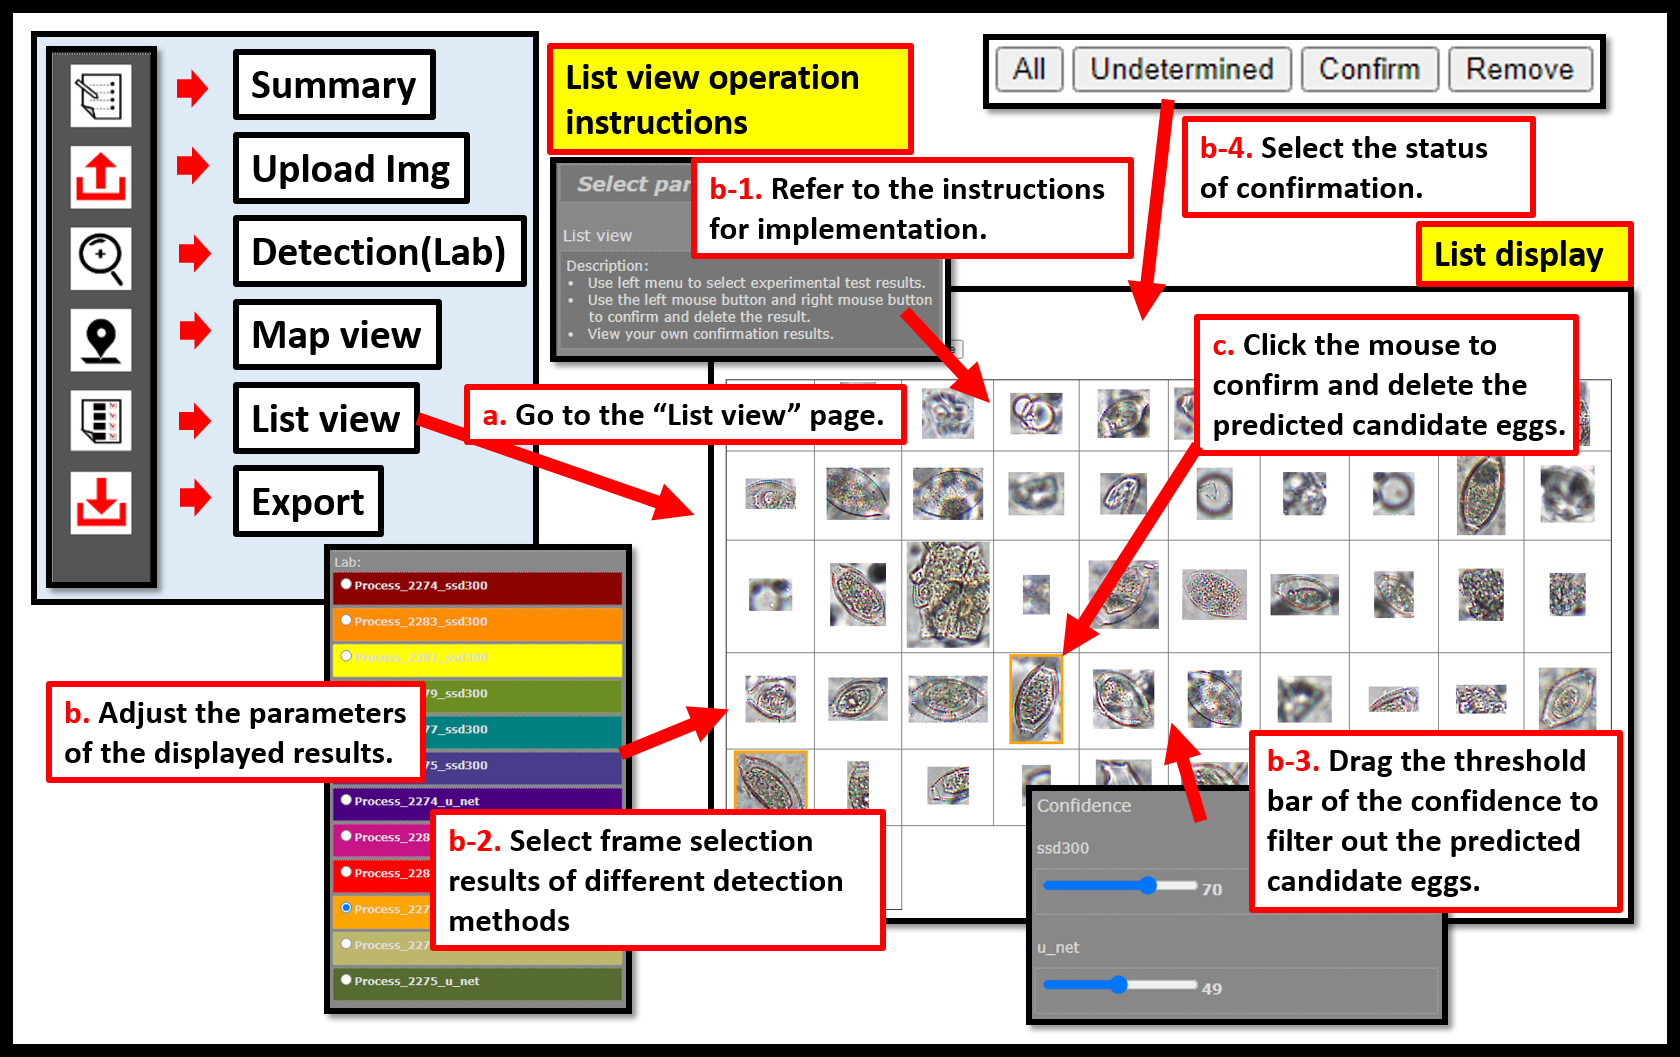
The "List View" page summarizes the recognition results in a list (a). The page contains a display interface and a menu to operate the interface (b). A more concise interface is provided to allow users to quickly view the confirmation status of candidate parasite eggs. You can first understand the operation of the page through the description (b-1). Users can choose to list the results of different identification methods (b-2). In order to get a clearer understanding of the confirmation status of the eggs, you can select "All", "Undetermined", "Confirm", and "Remove" to display the eggs in four different confirmed states on the interface (b-4). Similar to the "Map View" page, the user can drag the confidence threshold bar to filter out the predicted candidate eggs (b-3), and then click the mouse to confirm and delete the predicted candidate eggs (c).

After the above series of steps, the user can obtain the result of selecting the egg of the target slide. After clicking "Export" in the function menu, you can go to the page where the results are generated (a). The user can select an appropriate background image to display the frame selection of the eggs (b). The image will be processed in the background, and then a download link will be generated (c). Click the download link to get a compressed file of the result (d).